If you don’t have a background in the industry, it’s hard to understand how clothing is made. When working with garment production for the first time, many people will experience.
- Frustrated by delays
- Longer delivery cycles
- Factory can’t adapt to last-minute brand changes
First a sketch, then a technology package, and finally a CAD layout for any design. Then you have to make your own clothes!
But if you want to manage production internally, not outsourcing. You will soon learn how to make clothes that are not as easy as cleaning a room, setting up a sewing machine and cutting table.
From beginning to end, this is what it looks like. However, many of these processes occur simultaneously in the garment manufacturing process.

Make A Plan For Marketing And Sales
Before you start producing clothes on a large scale, you should know how much you can sell. This is a tricky situation and takes some time to learn how to find a good balance between how much you want and how much you can (and should) earn. Talk to a shop you think may be interested in selling your clothes.
Ask the minimum order, how often they order them again, and how much they can usually sell. When will they place orders for different seasons and when will they deliver? All this information affects how you market and sell your clothes to retailers.
Make Your Designs
Most factory-made clothes are produced on pipelines, where different people cut, align and sew clothes. Your pattern must be very clear and accurate, with all the necessary markings, so that every time you make a dress, it will be exactly the same.
Putting The Patterns In Order
Grading and size can be difficult to understand, even for those who make their own patterns. How did the dress change from No. 2 to No. 10? How do they differ? Similarly, this is usually the work of professionals unless you want to create a pattern for each size of clothing you sell.
When using digital patterns, pattern makers can make as precise changes and adjustments as surgery. All changes measured can be seen and tracked in real time.
Lay-Plan: Getting Patterns Ready To Be Made
The next step is to print out the pattern using the plotter. To do this, you have to have a proper layout plan, which means that all the pattern blocks are placed in a certain order (sampled in our case), taking into account factors such as the length of the fabric, the width of the roll, the total number of items to be made and the size breakdown.
Now that the pattern is already in the system, this is easy to do. The software for planar arrangement then proposes the best way to arrange these geometries (patterns) based on the number of fabrics and other factors, so that you can make the most of it and reduce its use. Although the software does well, there are still some things that can be done better.
Keep in mind that the amount of clothing fabric required for samples and how to mass produce clothing for the same product can vary considerably. You put the shapes together and try not to leave any spaces or spaces.
Making The Cuts
The plotter prints our patterns based on pre-created floor plans, and the workers prepare to crop our fabric. The patterns are printed on special paper and stick perfectly to the fabric, so nothing moves when they are cut. When cutting begins, we see that the first part is done by hand with scissors, but the finer part is cut with special tools.
Samples are usually cut by hand, while the mass production of clothing is slightly different. Similar fabrics are stacked together like cakes and cut in large quantities. Whether the fabric is cropped together depends on what it is made of and its thickness.
For example, you cannot cut both cotton and viscose fibers. When you cut different fabrics, some are more stretched and deformed than others, so the end result is uneven. This is why even if the material is only 1% different, separate cutting is required.
Putting Together Sets For The Sewers
After all the fragments are cut, they are regrouped together. To save time in the production of clothing, combine similar tasks so that people can do the same thing more quickly and again.
Colors Choice
For the apparel production stage, select a line that matches the fabric color. I found the best colors in a wide range of options. Some people only have small differences, some people don’t even see all the shadows. Apart from elastic straps, these items do not require any decoration, but the fabric has a variety of zippers, buttons and other accessories.
Making Changes To The Machinery
Every sewing machine needs to be set up for some kind of fabric. Remove the old thread and put in the new scroll of the color you choose for our sample. The seamstress put six rolls of the same color thread in the flat-lock sewing machine. She then tested the joints of a piece of fabric to make sure the tension was set and adjusted correctly.
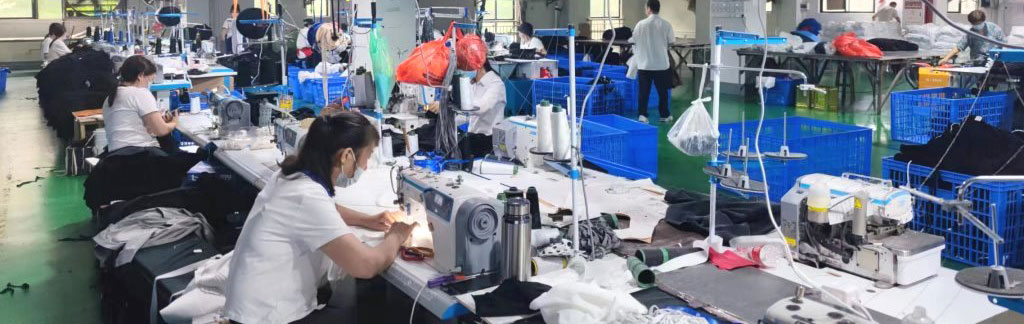
Sewing Up
Check it out and make sure everything is arranged and put the set together until you can see the design together.
Finishing
When the items are finished, I take them to the sampling unit and compare the measurements to our specifications. You want your things to arrive intact. This may mean soaking them in a stable starch solution and pressing them properly, or sealing them vacuum in a garment bag to prevent delicate beading damage.
Everything should look good and you should do a thorough quality check. After that, you should approve them for grading and send them to the next big order.
Box Up And Send
It’s time to go! Carefully inventory the order as it is packed to ensure that the correct item is delivered to the right customer. No one wants to go through the trouble of re-shipping and expect them to be sent back correctly.
Keep In Touch With Your Customers
Your questions about how the garment is made have been answered and sent out, and (hopefully) customers start buying as soon as they hit the shelves. But are you sure? Do you really want to see anything in your store? Things aren’t as fast as you think? Contact your retailer to find out where you can do better in the future.